Setting up a WiFi Booster for an Indoor Wireless System

If you do not work with wireless components every day, the prospect of adding a new component to boost the power of your signal may seem daunting. While we always recommend you have a professional install communications equipment to ensure it is done correctly, this brief tutorial will give you the basic steps to set up a simple WiFi booster. If it helps, you can also take a look at the video in this post or visit our complete tutorial here.
If you have a WLAN setup that requires a stronger signal, a simple WiFi booster may do the trick. Due to FCC regulations, if you are doing this installation in the United States, you need FCC approval to buy the amplifier. If you don't need an amplifier with power over 1 Watt, you can purchase an FCC certified amplifier kit which requires no special operator's license. Either way, most setups follow this simple procedure.

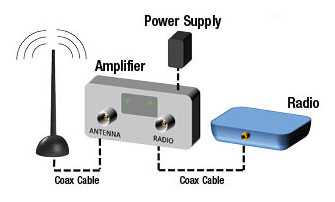
On the amplifier, you will typically see two coaxial cable jacks, one labeled "Antenna" and the other labeled "Radio". There should also be a power jack (usually a DC jack requiring an external power adapter), which is where the amplifier gets the power to repeat the signal.
Using low-loss coaxial cable, simply connect the antenna to the antenna jack on the amplifier, and the radio (or access point or router, etc) to the radio jack. Then, after the two sides are hooked up, attach the power adapter and plug it in. Most amplifiers have LED lights to indicate activity, which helps you to see if it is working.
It's that easy!

